Guide
Connect Facebook and Instagram to Evolamate
This is how you turn on automatic publishing. You create your own free Meta app and paste three values into Evolamate — about five minutes, following the video below, and you never do it again. Because the app is yours, the connection is yours: it isn't shared with other businesses, your Page and Instagram stay under your control, and you can revoke access at any time from your own Meta dashboard.
Would rather not connect anything? You don't have to. Approved posts for Facebook and Instagram always appear in your Planner as ready-to-post packs — designed image, caption, one tap to copy.
About the screenshots
These are real screens from our own Facebook Page, Instagram account and Meta app — we used a live setup rather than mock-ups so you can see exactly what to expect. Wherever the pictures show the Evolamate name, logo, handle or bio, you should be looking at your own business instead.
Nothing in the pictures needs to be copied. Don't create anything called Evolamate and don't reuse our names, categories or descriptions — follow the path through each screen and use what is already yours.
Rather do it together? Book a free 15-minute setup call and a team member walks through every step with you on screen — pick a time here.
- 1
Have a Facebook Page (skip if you already do)
Evolamate publishes to a Facebook Page, not a personal profile. If your business doesn't have one yet, create it first at facebook.com/pages/create (two minutes — name, category, done). Already have a Page? Skip straight to step 2.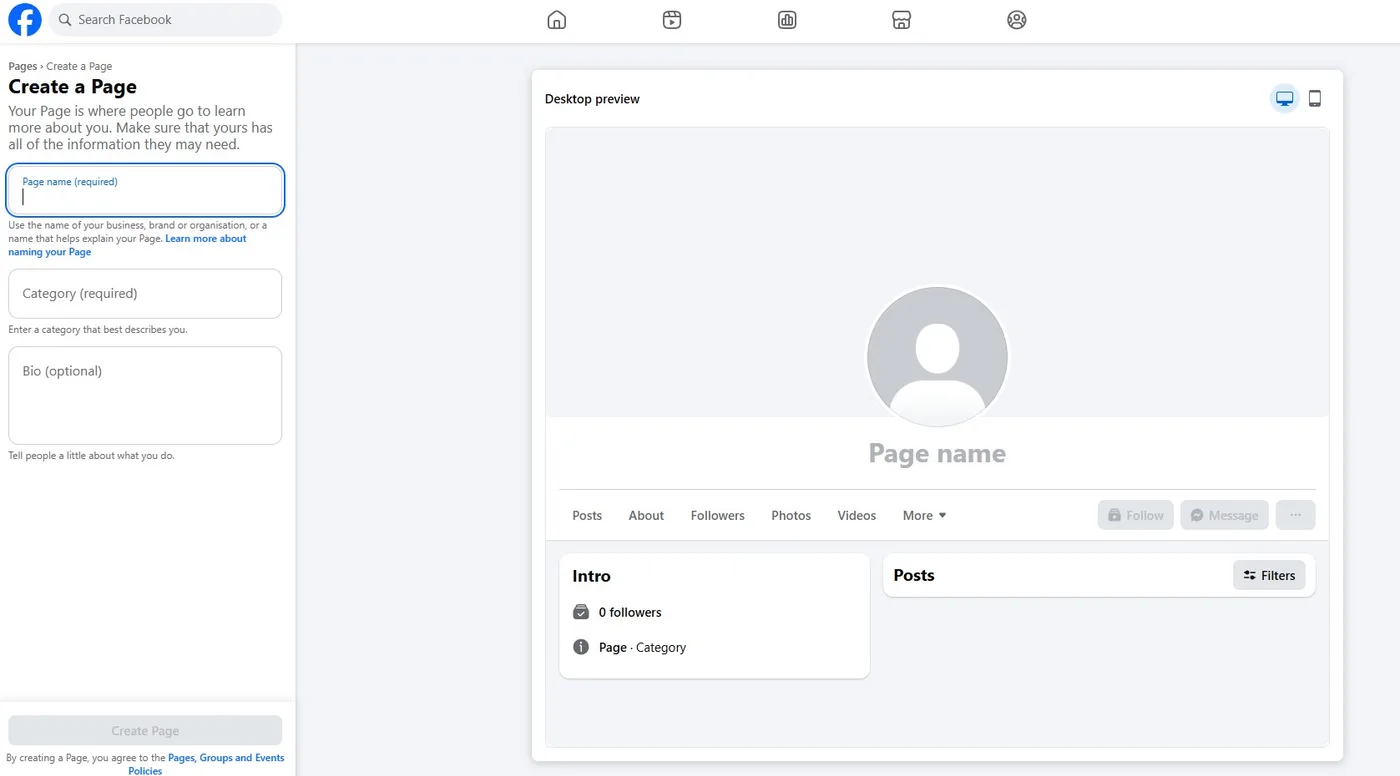
- 2
Open the Meta apps page
Open developers.facebook.com/apps and log in with the Facebook account that admins your Page (use your real, established account — a brand-new profile creating apps straight away can trip Meta's automated checks). First time here? Meta asks you to register as a developer — free and instant. Then press the green Create App button, top right.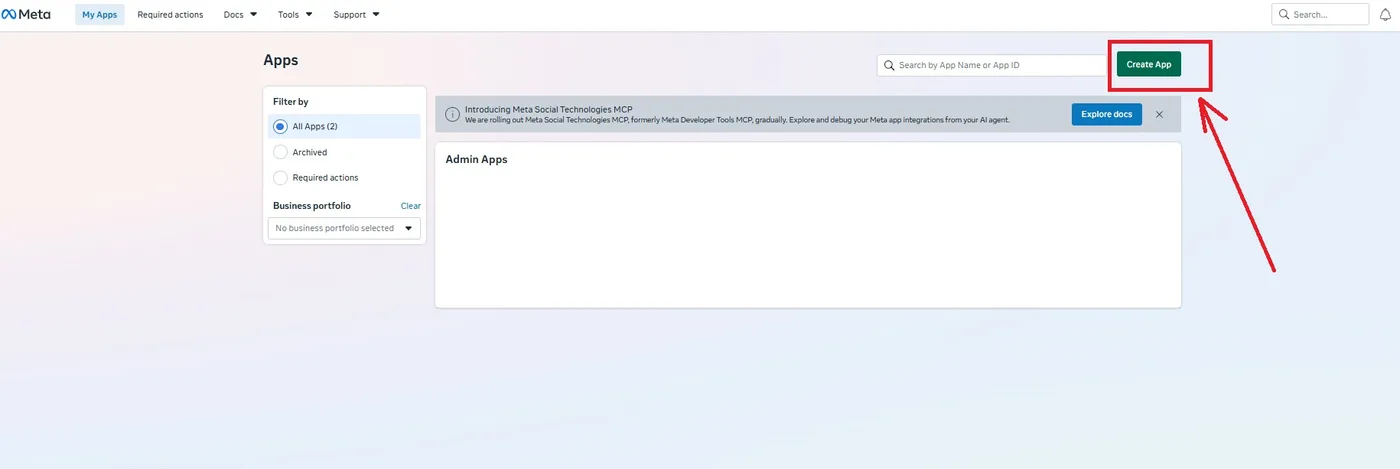
- 3
Create the app (the wizard)
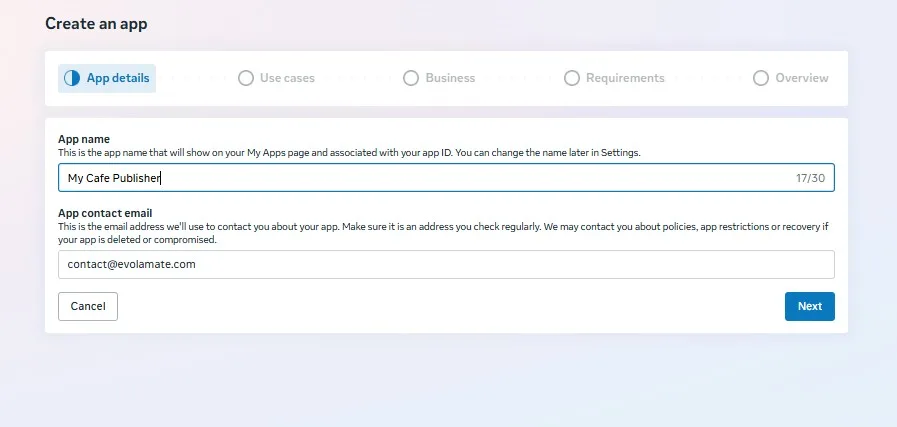
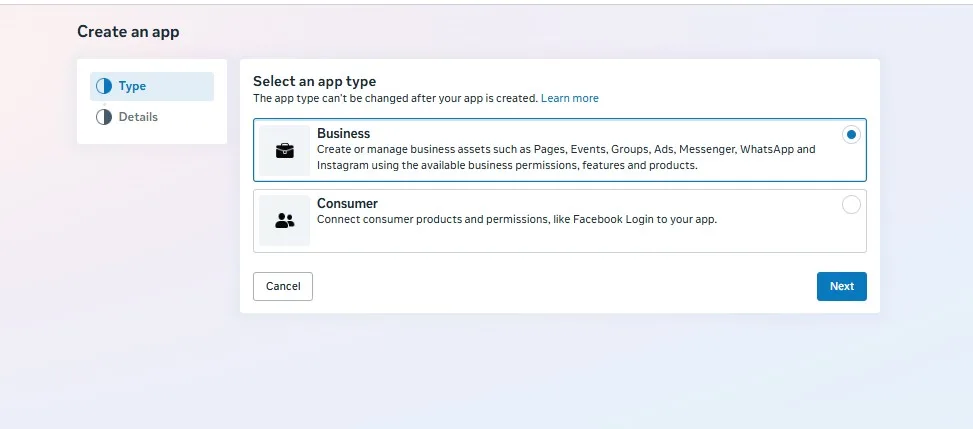
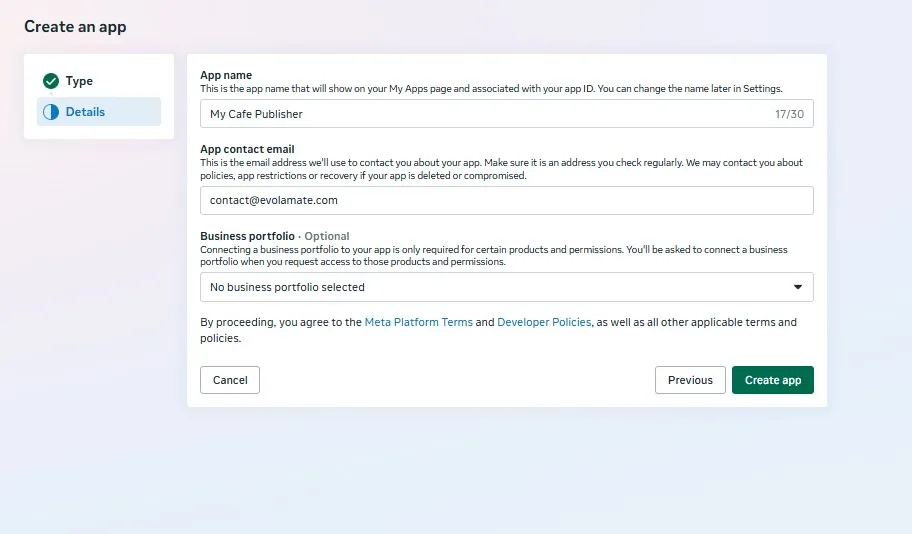
The wizard walks through App details → Use cases → Business:- App details: name it after your business (e.g. MyCafe Publisher) and enter your business email.
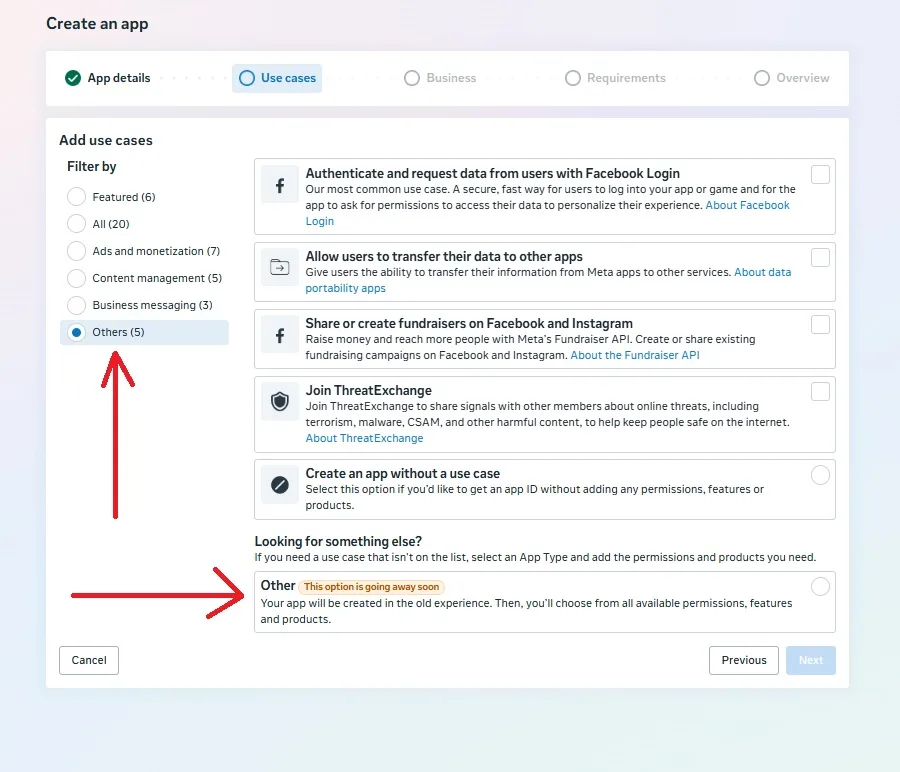
- Use cases: select Other, under "Looking for something else?" at the bottom. (Meta labels it "going away soon" — it still works; if it has disappeared for you, pick Authenticate and request data from users with Facebook Login instead and continue.)
- App type: choose Business.
- Details: confirm name and email; Business portfolio is optional — "No business portfolio selected" is fine. Create the app.
- 4
Set up Facebook Login for Business — and ONLY that
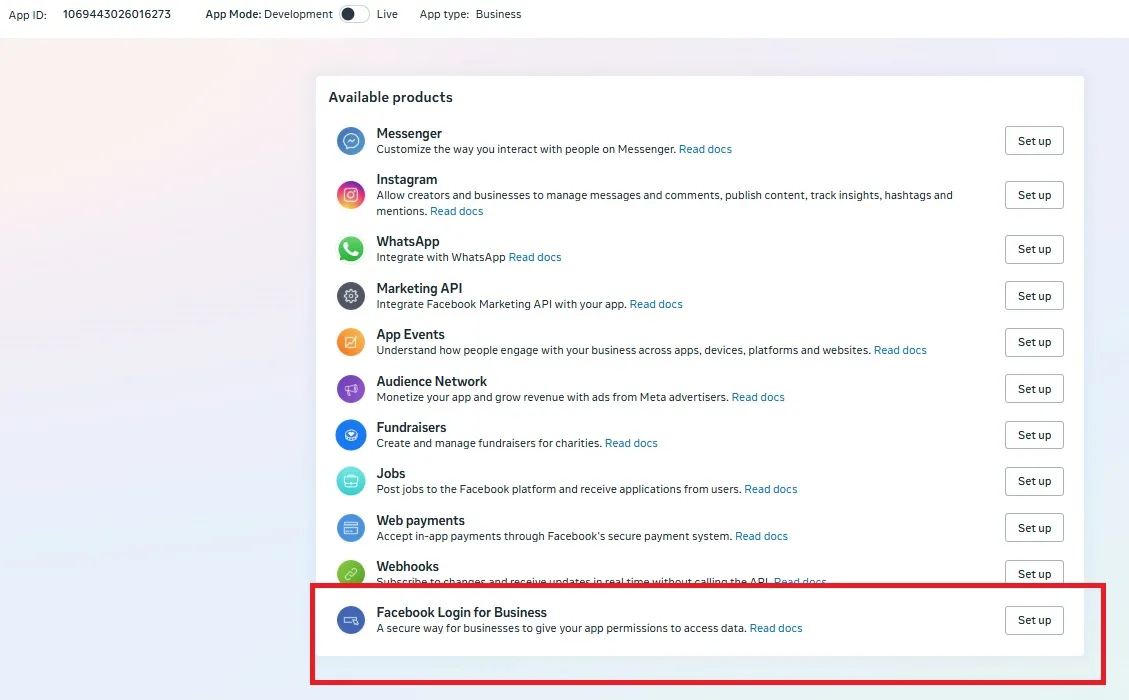
You land on an Available products list (Messenger, Instagram, WhatsApp and more). Ignore all of them — press Set up next to Facebook Login for Business only. (Instagram publishing works through your Facebook Page's linked Instagram account via the login permissions — the separate "Instagram" product is a different API you don't need.)A yellow banner may say Facebook Login for Business requires advanced access to public_profile — ignore it. Advanced access only matters when an app serves the general public; standard-access permissions always work for people with roles on the app, and that's you (you created it). Don't start any verification it offers.
Likewise, App settings → Basic (privacy policy URL, icon, category) can stay empty for now — you fill them in step 7, where a two-minute Live-mode switch unlocks direct ads with a call-to-action button. Publishing and boosting never need it.
- 5
Allow Evolamate's callback URL
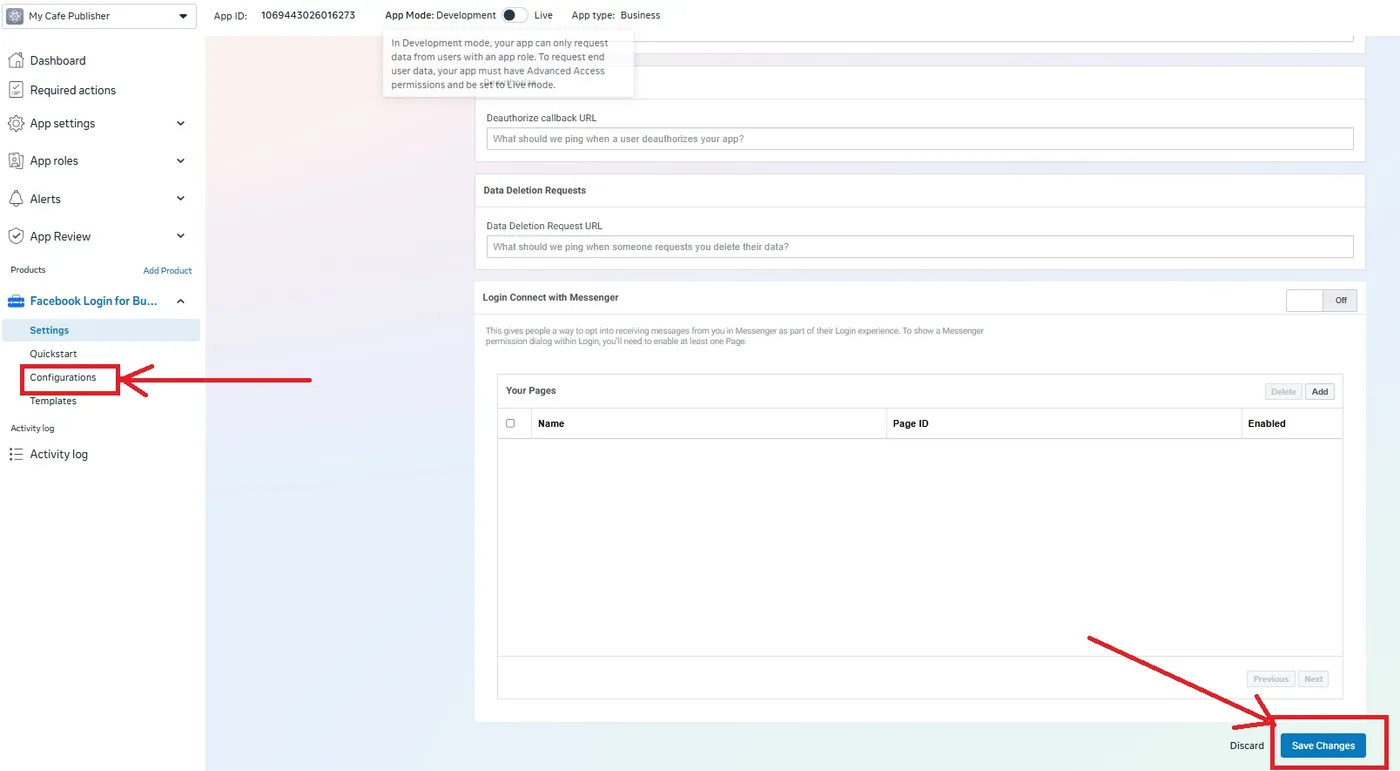
Setting up drops you on Facebook Login for Business → Settings. Leave every toggle at its default (Client OAuth login Yes, Web OAuth login Yes, Enforce HTTPS Yes, Strict Mode Yes). In Valid OAuth Redirect URIs, paste exactly (click to copy):Scroll down and Save changes. The Redirect URI Validator above the settings confirms with a green tick: "This is a valid redirect URI for this application".Valid OAuth Redirect URI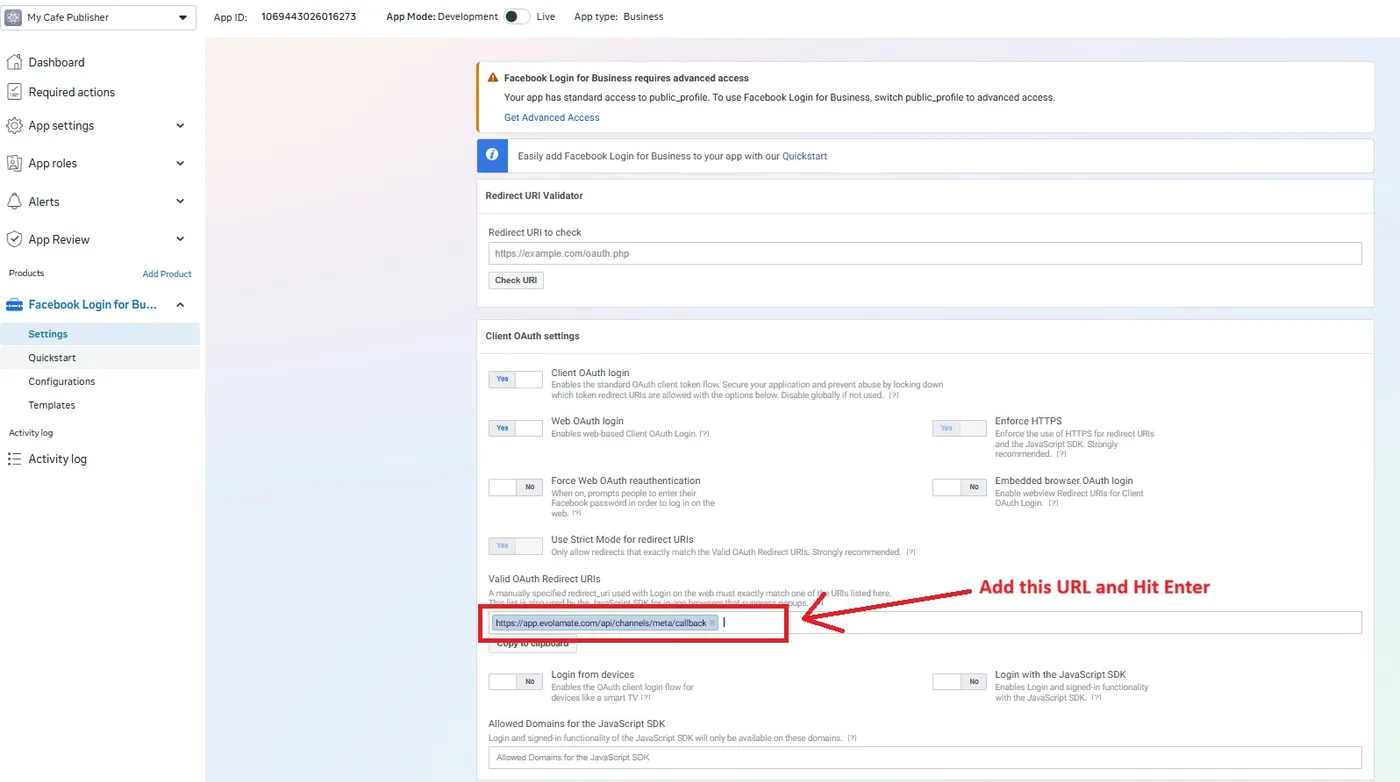
- 6
Create a Configuration
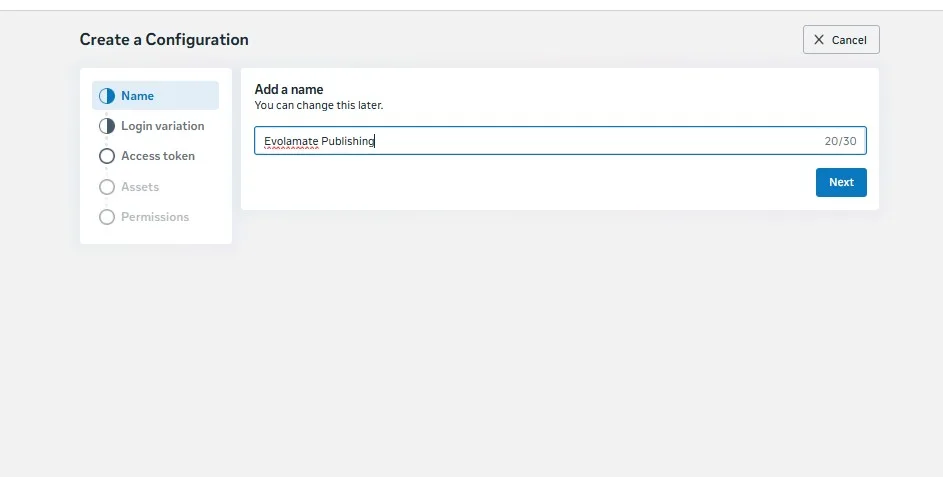
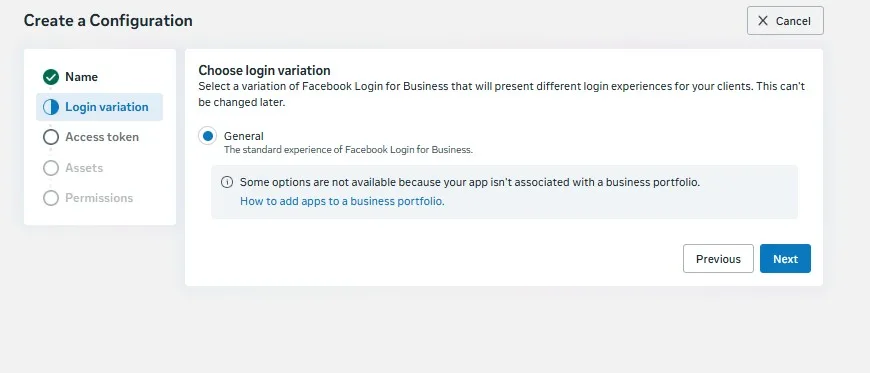
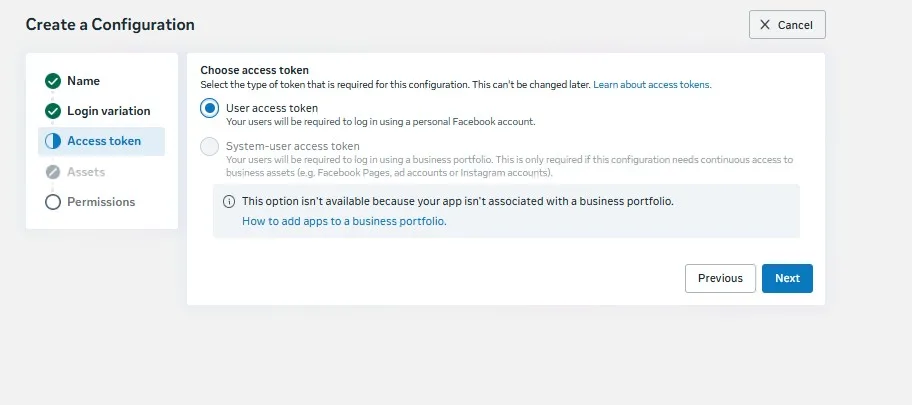
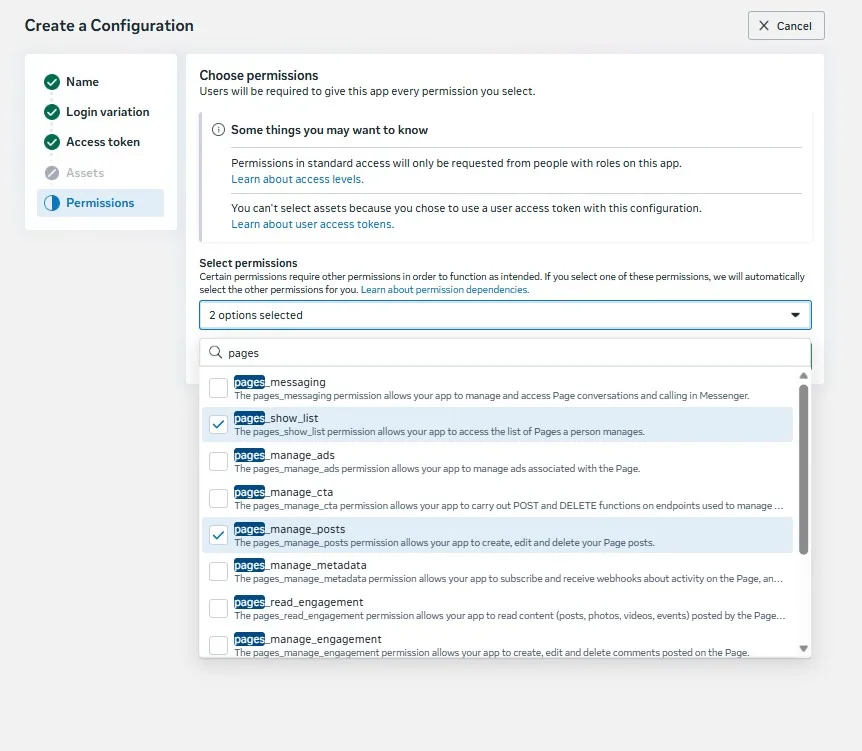
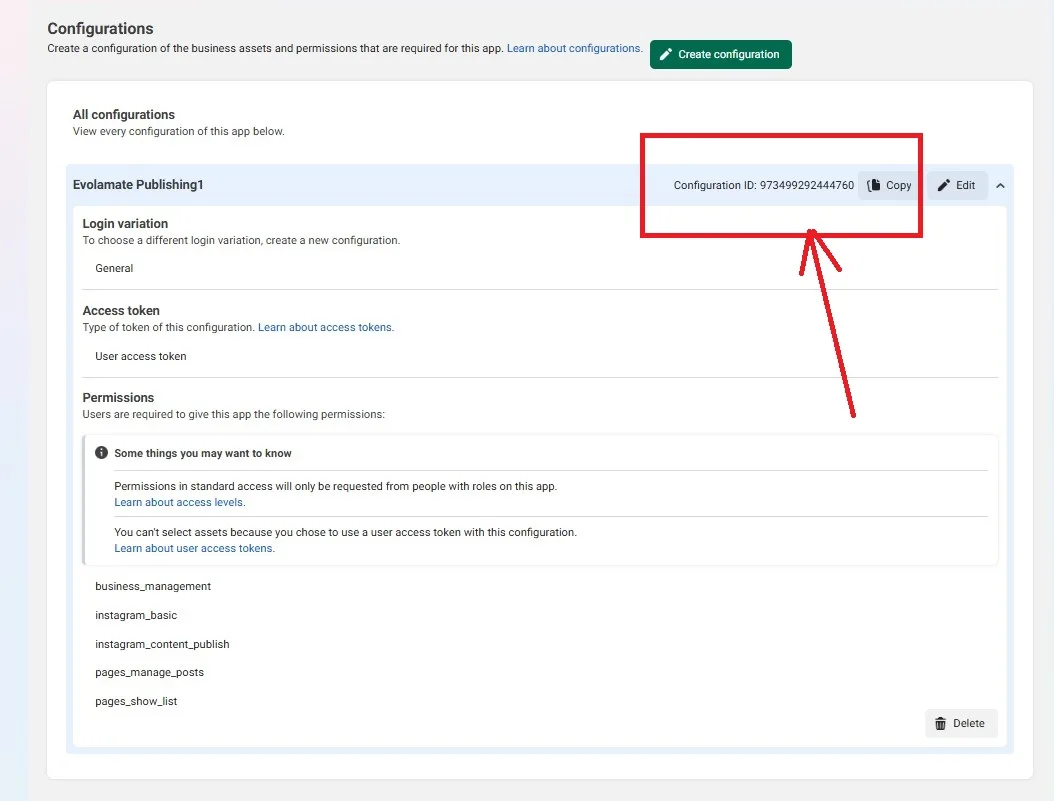
In the left menu under Facebook Login for Business, open Configurations → Create configuration. Name it (e.g. Evolamate Publishing), login variation General, token type User access token (the system-user option is greyed out without a business portfolio — that's fine). Then use the search box and tick ALL 18 permissions below — every one, in one go, so the whole Evolamate experience works from a single connection (missing one silently disables a feature — the table numbers them so you can count as you go):All 18 permissions — tick every one
Click a name to copy it, paste into Meta's search box
1 find your Page 2 publish to Facebook 3 find your Instagram 4 publish to Instagram 5 connect business assets 6 post performance → Evolamate learns 7 Instagram reach & views into your Insights 8 comments into your Inbox 9 read comments and visitor posts on your Page 10 keep the Page connection and Inbox up to date 11 send comment replies from Evolamate 12 Instagram comments + replies 13 Instagram direct messages into your Inbox — and replies sent from Evolamate 14 Messenger messages into your Inbox — and replies sent from Evolamate 15 live Ads Insights and reports 16 the ads intelligence connection 17 create and pause campaigns (always paused first) 18 advertise with your Page — without this, ads can't attach to it All of these are standard-access, granted instantly to you as the app's creator — no review, no waiting. Create, and copy the Configuration ID (a long number).
- 7
Copy your App ID and App Secret
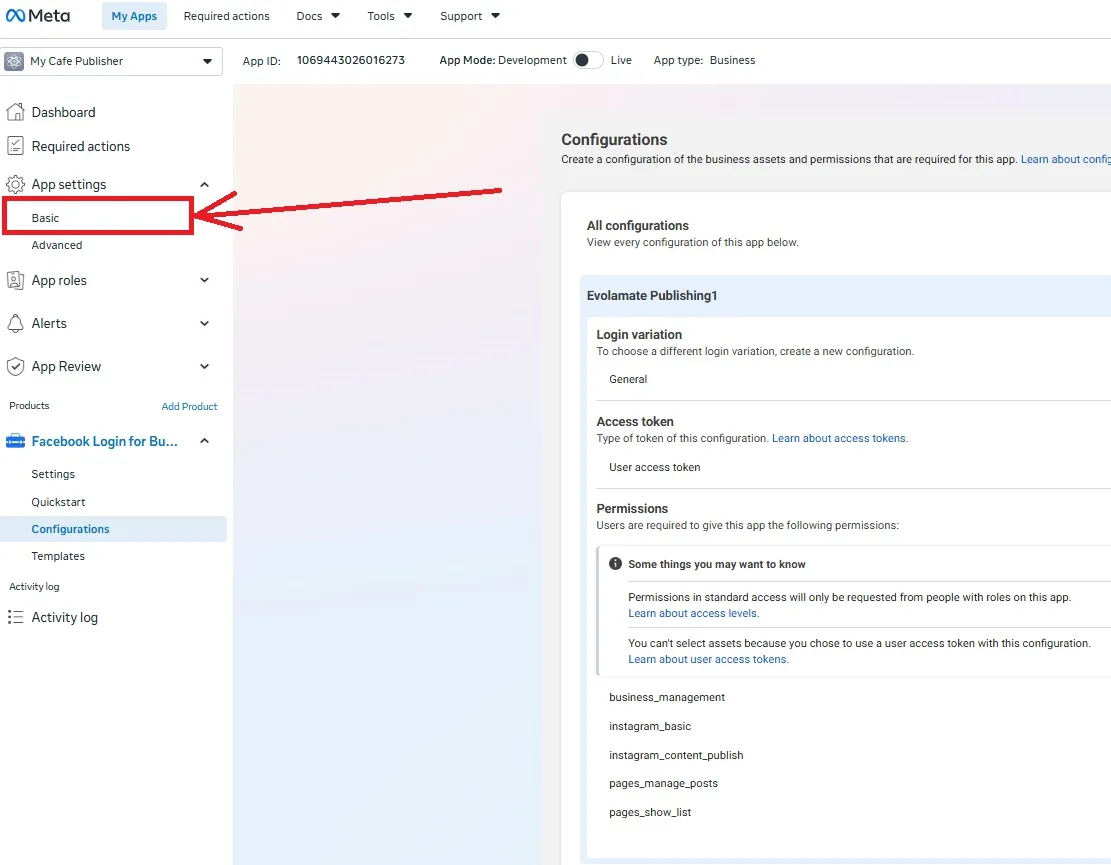
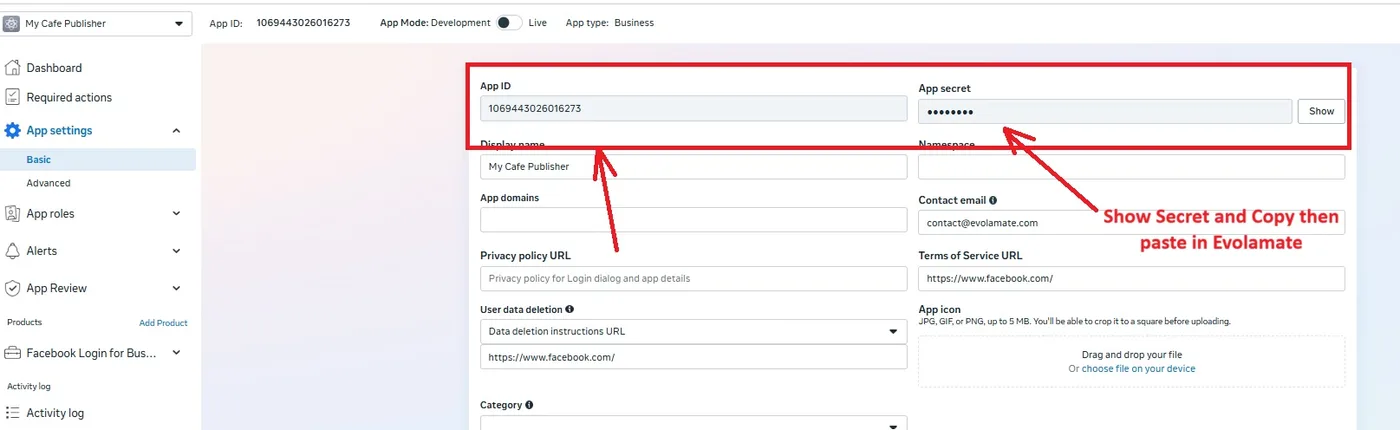
In the left sidebar of your app's dashboard (the menu listing Dashboard, Required actions, App settings, App roles…), click App settings to expand it, then Basic.- App ID is the first field, top left — copy it. (It also shows in the bar at the very top of every page.)
- App secret is top right, shown as dots with "For your security, do not share this with anyone". Click Show (Facebook may ask for your password), then copy it. Treat it like a password — Evolamate encrypts it the moment you save and can never display it again.
While you're on this page: set your app Live — it unlocks ad buttons
In Development mode your ads run by boosting your published posts (which works well and carries their likes and comments into the ad). Switching the app to Live additionally unlocks direct ads with a real call-to-action button (Learn More → your website) — so do it now while you're here. Fill these three fields, copying each URL with one click — your app exists to connect to Evolamate, and these pages describe exactly how that data is handled:
Privacy policy URLTerms of Service URLUser data deletion — instructions URLThen pick a Category (Business), upload any square image as the app icon, press Save changes, and flip the App Mode toggle at the very top from Development to Live.
Nothing you've set up changes — publishing and boosting keep working exactly as before, because you hold a role on your own app. Do not submit App Review: it's for apps serving the public, and yours serves only you.
- 8
Paste the three values into Evolamate
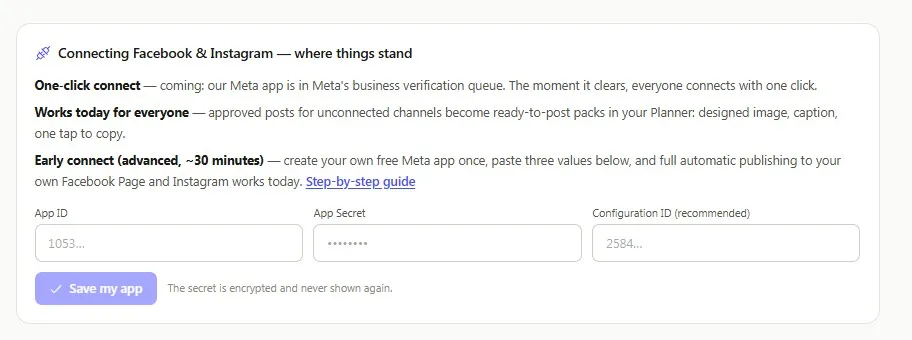
In Evolamate, open Channels and scroll to Connect Facebook & Instagram — the direct connection → click I've created my Meta app — enter the details. Three fields appear:- App ID — the long number from step 7.
- App Secret — pasted characters show as dots.
- Configuration ID — from step 6.
- 9
Connect — the Page is chosen HERE, not in the app
On the same Channels page, press Connect Facebook. A Facebook window opens — make sure you are logged in as the same account that created the app.- The dialog says "Continue as [your name]" — choose Edit settings instead of continuing blindly.
- Facebook lists the Pages you admin — tick your business Page. If an Instagram business account is linked to that Page, it appears too — tick it as well.
- Approve all the requested permissions (they are exactly the 18 you configured in step 6 — nothing more).
- 10
Instagram (if it didn't connect in step 9)
Instagram connects through the Facebook Page it is linked to — there is no separate Instagram login. If step 9 connected only Facebook, your Instagram isn't a Business account linked to your Page yet: follow the Instagram setup guide (ten minutes, one-time), then press Connect again and choose Edit settings on the dialog to tick the Instagram account.
Troubleshooting
- "App not active" on the login dialog — you are logged into a Facebook account that isn't on the app. Use the account that created the app, or add your other account under App roles.
- Instagram didn't connect — your Instagram must be a Business account linked to your Facebook Page. Follow the Instagram guide first, then reconnect.
- Redirect URI error — step 5's URL must match exactly, including https and no trailing slash.
Why this is legitimate: Meta's Development Mode exists precisely so an app's own administrators can use it with their own assets. You are the admin of your app, connecting your own Page — no review required. Evolamate stores your app secret encrypted, uses it only to complete the login handshake, and you can remove it any time from the Channels page.